Cycling for Beginners: The Ultimate Guide
Article by Tori Bortman | Found on Bicycling.com
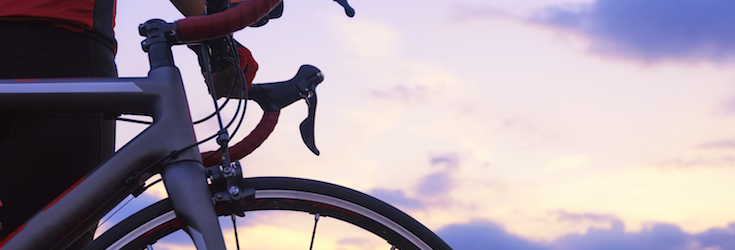
Positioned for Success
If you’re new to road biking, you may feel on your first rides as if your body is being thrown unnaturally far forward. Because your whole torso is relatively low to the ground, it might I seem as if you could go over the bar at any second. Stay relaxed and practice riding in low-traffic areas, and soon your fight-or-flight reptilian brain will learn that this position is as comfortable and as safe as any other—because it is.
There are three riding positions. The most common is neutral, in which your hands are generally on top of the hoods (which cover the brake levers) so you have access to the brakes and shifters. If the bike fits you properly, you will be able to freely turn your head to look around, not have too much pressure on your hands, and feel comfortable for extended periods of time. Viewed from the side, your torso and arms should almost form a 90-degree angle. Make an effort to keep your shoulders broad and away from your ears and your chest forward.
When you need to lower your torso or center of gravity, the C-shaped lower portion of your handlebar—called the “drops”—is there for you. You’ll want your hands in the drops most often when descending, especially down long, steep inclines. Your torso will be bent more forward from the hips and your wrists will be angled so you can readily reach the brake levers, and you’ll have more leverage when you use them. When you move to this position for descending, you’ll also shift your weight slightly backward in your seat and toward the rear wheel to give you more traction. For easy ways to adjust your bike for a better fit, and learn basic bike maintenance, check out Bicycling’s Fast & Easy Bike Maintenance online course.
As you spend more time in the saddle and find your comfort zones, try standing, a position mostly used when climbing but also to rest your muscles and soft tissues. To stand, start in a neutral position. As you rise up, your weight will naturally shift forward, which may cause your bike to lurch a bit. Keep your arms relaxed so you can easily make this transition without swerving. With your torso bent slightly forward, keep your hips (essentially your center of gravity) still, mostly centered above and just in front of the nose of the saddle.
Steer Clear of Road Trouble
Descend with confidence and avoid hazards with this simple advice
Potholes & Debris
Keep your eyes up the road so you can move out of the way of the likes of broken glass and loose gravel. If you can’t avoid an obstacle, stand on your pedals and relax your arms and legs. Don’t hit the brakes; momentum will help carry you over.
Rain
Ride a little slower than normal, give yourself longer to slow, and make yourself as visible as possible with bright clothing or lights.
Railroad Tracks
Always cross the tracks as close to 90 degrees as possible. By making your path perpendicular to the grooves, you’re less likely to fall into them. If the tracks are raised or rutted, coast over them without braking.
Other Cyclists
On a shared path, you might be cycling with people who may have no idea how to ride with others. Slow down and ring your bell or call out a warning of “On your left!” before passing on that side.
Wet Leaves or Metal
Brake and slow down before, for example, rolling over rain-soaked manhole covers. When your tires make contact, coast—don’t pedal or brake. Accelerating or hitting the brakes can cause your wheels to slide out.
Motor Vehicles
Keep an eye out for cars exiting or entering driveways or other turns. If it looks like a car is slowing but isn’t signaling, assume it is going to turn anyway and wait to see what it does before proceeding.
Turn the Corner
Most novices intuitively assume that steering through corners requires turning the handlebar. This is true at very slow speeds, but for the most part you’ll guide the bike around curves by leaning the frame and shifting your weight in the direction you’re turning.
First, and we can’t emphasize this enough, relax. Loose joints allow you to move around on the bike easily and stay off the brakes. Next, look ahead, through, and around the bend. You’ll be tempted to look straight into the corner of the turn. If you do, that’s where you’ll ride—possibly right off the road. It may sound counter-intuitive, but force yourself to look as far down the road as possible by following the pavement markings until they disappear on the horizon. Sometimes this means your head will be turned completely to one side, and it may seem like you’re not watching where you’re going, but that’s precisely what you’re doing. When you look far ahead, your bike and body will naturally veer in the correct direction while your peripheral vision picks up any obstacles on the road in front of you. As you coast around the corner, make a wide arc. To do this, you’ll use the whole lane, so make sure traffic is clear. As you enter the turn, start with your bike close to the outside of the curve. Riding into it, aim for the inside of the corner (but don’t cross into the other lane). As you exit, arc back to the outside.
Position your feet so your inside pedal (the one closest to the apex) is up and your pedal to the outside of the turn is down. This will naturally angle the bike somewhat, and this temporary shift in your normally upright position might seem a little scary at first, but it takes advantage of the bike’s natural gravitational pull. If you try to fight this by keeping your bike upright, you’ll lose traction and speed.
On fast corners, try putting your hands in the drops to lower your center of gravity and stabilize yourself. Because the gravitational forces of riding through a curve will cause you to accelerate, always lower your speed before entering the turn. By the time you hit the bend, you should already have slowed down enough that you barely touch the brakes. The thing to avoid: braking hard in the turn. That changes your weight distribution and causes the bike to go from leaning and gripped to the road to upright, difficult to control, and likely to skid out.
Going Up
Climbing hills is about more than strength. Add the right skills and strategy and you’ll always reach the top.
Prepare
Before the road rises, take a swig from your bottle, consciously relax your body, and maybe even slow down. When you start out tense, you’ll feel worse on the way up. If it’s hot, unzip your jersey a bit.
Downshift
Get into an easier gear that lets you turn the pedals quickly without pushing hard. Once the chain is under a lot of tension, it becomes more difficult for it to move between cogs. Brush up on your shifting fundamentals if you’re not sure which gear to use.
Conserve Energy
Keep your breathing deep and steady. If it’s hard to push down on the pedals, concentrate on pulling up. Resist the urge to gun it early. If you feel good as you approach the top, that’s the time to push.
Play Mind Games
Climbing is as much mental as it is physical. Experiment with distractions. Focus on a tree or a sign up ahead and watch the distance shrink. Sing. Tell a joke. Smile. Try to forget you’re climbing.
Move Around
Alternate sitting and standing to use all your muscle groups. If you run through all your gears and can no longer spin easily, move your hands to the hoods and push against them for leverage as you pedal.
| Get Excited As you near the top, take a minute to breathe, look around at the scenery, and prepare for your reward–the descent. If you’re really spent, put your feet down and take a rest. And, hey, why not Instagram the view? |
It’s OK to…
1. Go at your own pace. Other riders may be waiting at the top, but that’s not your problem.
2. Get off and walk. Everyone has done it. When remounting, make sure your bike is in an easy gear, check for traffic, then angle your bike across the road.
3. Zig-zag. If the hill is really steep, tack across teh road as much as is safe. You’ll slightly level the hill, through you will add distance.

The Stance
Start seated. Keep your back straight and shoulders down so your lungs can expand and take in plenty of oxygen. Relax your arms, with your elbows slightly bent, hands resting comfortably on the bar tops several inches away from the stem. Try to avoid wasting energy with a death grip on the bar. To get more power from your glutes, lower your upper body toward the top tube. If you stand, position your butt over the saddle with your weight centered over the bottom bracket.
Did you know:
Encouraging yourself with a non-first-person pronoun (“You can do it”) is more effective than using first person (“I can do it”).
(Journal of Personality and Social Psychology)
Know Your Cycling Etiquette
A few basic rules of the road
 |
Be Predictable Nobody feels safe around the car that’s swerving, not using signals, and stopping suddenly. Ride as you would drive—as if you were trying to pass a driver’s-license test. |
 |
Stick to the Law In most states, bikes are considered vehicles. When riding in the road, always signal, make complete stops at signs, and wait for red lights for your turn to ride through. |
 |
Ride to the Right If there’s no shoulder on a two-way street, it’s always safer to stay a couple of feet out into the road. You’ll be visible and force cars behind you to move into the oncoming lane to pass you. |
 |
… Except When Turning Left For this move, you’ll want to move from the right to the middle of the lane or merge into the left-turn lane if there is one. Check over your left shoulder for oncoming traffic and signal left before moving over. |
 |
Stay off Sidewalks Lousy sight lines and people entering or exiting doorways and driveways make riding on sidewalks an accident waiting to happen. If you have to, and the city permits it, ride no faster than 6 to 8 mph—the speed most people jog. |
Pedal Like a Pro
One tip of the pros is that staying “light” on the pedals keeps them ready for anything their competitors throw at them. If they want to surge ahead, they can quickly do so without shifting. When they do choose to shift, it’s easy and whisper-soft because the tension on the chain is so low. Even if you never plan on racing, these techniques help you become a better rider. Sometimes you’ll need a burst of speed to make it through a yellow light, and this makes you nimble and efficient. Being light is also being relaxed—an advantage in any situation.
Staying light on the pedals is all about spinning with smooth, evenly distributed power. There’s an easy way to tell which part of the pedal stroke you’re using. If your butt lifts slightly off the saddle when your cadence is high, it’s because your legs are hammering downward—but neglecting the rest of the stroke. This is referred to as “pedaling squares”—the opposite of nice circles.
Starting with your right foot in the 2 o’clock position, control the power of your stroke so you don’t just force it down. This will use mostly the quads in the front and top of your leg. As you reach the bottom—the 4 o’clock to 7 o’clock position—imagine dragging the bottom of your shoe against the ground as if wiping mud off the bottom. Your foot should pull back, engaging your glute muscles. At this point, your left foot will be in the power position, ready to push down, so your right foot will be tempted to slack off and take a break. Lifting up and over the back and top of the right pedal to complete your circle is the most important (and trickiest) part of the stroke. Lift up and over through the 8 to 11 o’clock positions. This will take pressure off the down-stroke power in your other leg and allow your feet to move in beautiful, flowing circles.
It’s sometimes best to pull your foot up hard into the top of your shoe then forward over the top of your circle. This uses your calves and glutes and feels a little like scrambling up a rocky slope. And mind your pedaling when climbing—that’s when it’s hardest to keep things together and flowing.
17 More Fueling, Apparel, and Gear Tips
Gear Up
These are essentials for a new rider (Check out our GearFinder for reviews and deals!)
Jersey
It’s cut longer in back and shorter in front to cover the base of your spine and keep material from binding up at your midsection when you’re riding. It also has rear pockets to carry stuff.
Shorts
They’re made of multiple panels of material to create a smooth, snug fit. And they include a chamois—a padded liner that protects you from soreness and chafing.
Shoes
If you’re using platform pedals—the kind you don’t clip your shoes into—go for the stiffest sole possible. Most road-riding shoes come with cleats that engage with the pedals, to maximize your power output (see opposite page).
Helmet
To be blunt: Wear one. Most helmets sold in bike shops meet the same safety standards whether they cost $40 or $300, but some manufacturers are now making lids meant to prevent concussions as well as more serious trauma.

Fit first
Have a new bike? Get a professional bike fit to see if you need to swap out these parts.
Stem
The stem affects how far you have to reach for the handlebar and is probably the most commonly replaced part because arm and torso lengths vary from rider to rider. Cost: usually around $40, but can go as high as $250.
Handlebar
The width and depth of the bar also affect your reach. $40-$300
Seatpost
You may need one that allows the saddle to be moved forward or back to optimize your position. $20-$200
Saddle
The seat is another commonly changed part. Some riders need one that has different pressure points or a cut-out area. After an hour of riding, your bottom will tell you if you have the right model. $40-$400
Cables
If a stem or handlebar swap makes the reach significantly longer, your brake and shifter cables may need to be replaced with longer ones. $20-$60—and labor to change them is sometimes not included.
Fuel Smart
The right foods do great things for your body. On the bike, they give you energy; off the bike, they repair and recharge your muscles.
Carbohydrates are your main energy source. The key is to know what type to consume, and when. Typically, slow-burning complex carbs (whole grains and oats) are best at dinner; starchy complex carbs (white rice or potatoes) are good as a medium-burning fuel to keep you riding strong; and for hard efforts over short periods of time, turn to simple carbs like honey.
Your body needs protein to rebuild your muscles so that your effort on the bike makes you stronger for next time. It also suppresses your appetite while revving up your metabolism because it takes longer to digest. Complete proteins include meat, dairy, eggs, and soybeans.
Fat is an excellent source of fuel, giving you the ability to cycle longer and harder without crashing from low blood sugar. It also keeps you from getting hungry. Go for natural sources of it, like olives, nuts, seeds, and avocados.
Layer Logic
Cycling clothing uniquely suited to keep you comfortable in any weather
Arm, Leg and Knee Warmers
These are small sleeves designed to fit over a specific part of your body to extend your clothing—turning short-sleeved jerseys into long, and so on. They can also be peeled off easily if conditions warrant.
Gloves
Cycling versions come with extra-thick material in the palm to protect your hands in case of an accident and relieve pressure on the nerves in wrists and palms. Full-fingered versions keep you warm on chilly days.
Headgear
To absorb sweat and give you minimal eye protection from the sun, small, traditional cycling caps fit under your helmet. In the winter, hats vary from tight skullcaps to caps with visors and special built-in earflaps.
Shoe Covers
Thick socks are impractical in snug cycling shoes. Shoe covers slide on to shelter your feet from wind and cold. They come in two lengths—simple toe covers and full booties with a cut-out for clip-less pedal cleats.
Stuff to keep in your saddle bag on every ride
A tire lever (or two)
A tube—out of the box and tightly encased in plastic wrap for ultimate shrinkage
Patch, glue, and emery cloth (essentially a patch kit without the box)
Cash (for food, bus fare, or as an emergency tire boot to keep the tube from pushing out of larger holes or gashes in your tire)
CO2 and inflator
ID/insurance card/debit card (Note: Debit card does not work as a replacement for cash in a tire boot)
A small multitool
A hand pump for backup duty (carried on the bike or in your pocket)
Grounded in the belief we are all unique beings, we begin each new client with a meticulous bio-mechanical evaluation, assessing each joint in its relationship to the movement of the body as a whole. Our therapists are skilled at reading the unique story your body tells, and treating everything from the bottom of your foot to the top of your head.
Bodywise Physical Therapy is located in Portland, Oregon. The Bodywise approach is wholistic, individualized, and can benefit people of all fitness levels. While Bodywise has always specialized in general orthopedics, spine rehabilitation, and sports medicine, they have evolved into a truly wholistic practice integrating Hands-on treatments with Mindfulness, Pilates, Trauma Release Exercise, Womens Health and Lymphedema.

